McScope
This page is about a reference DIY microscpoe control system similar to those used by John McMaster. Its intended to be a good starting place for what options might be for adding automated image capture to a microscope.
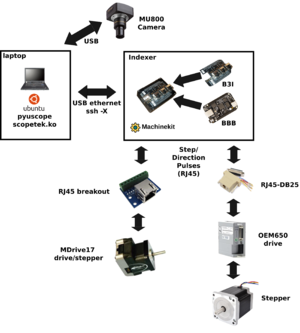
Above: high level sample architecture. In this example one axis uses an MDrive17 and a second axis uses a generic stepper motor without integrated driver. However, in a real system you probably want X and Y to use the same motor/drive
Useful links:
- https://github.com/SiliconAnalysis/pyuscope
- https://github.com/SiliconAnalysis/bbb-scope/blob/master/b3index_r1/b3index_r1/b3index_r1.pdf
- https://microwiki.org/media/scopetek/0001-scopetek-directly-control-RGB-gain.patch
- https://microwiki.org/wiki/index.php/Stepper_Motor
- https://www.machinekit.io
- https://beagleboard.org/black
Terminology:
- Indexer: a device that generates step/direction pulses
- Drive: power electronics for (stepper) motor
- Beaglebone Black (BBB): embedded board with lots of accurate timing I/O
- Machinekit: a CNC controller (indexer) distribution for BBB. Based on LinuxCNC
- BBB Indexer (B3I) cape (PCB): allows BBB I/O to adapt to current/voltage requirements of typical drive photodiodes with convenient connections
- BBB Indexer (B3I) system: b3i PCB + BBB assembly
Reference system, focusing on critical components:
- Microscope
- AmScope MU800 camera
- MDrive17 stepper motors on XY stage
- b3i system
- BBB
- Machinekit
- B3I cape
- T61p laptop
- Ubuntu 16.04LTS
- pyuscope (microscope control software)
- touptek.ko modified for direct RGB control
Reference workflow:
- Connect BBB over USB to host laptop
- Host laptop: static config IP to 192.168.7.1
- SSH -X from T61p to BBB (192.168.7.2)
- Launch LinuxCNC software over X
- Launch server.py RPC client (TODO: bring back automatic launch)
- Use LinuxCNC GUI for all setup movement, not pyuscope
- Optional: white balance camera using cal.py. Write values to microscope.json
- Start pyuscope software
- Select current objective (ie 20x)
- Use LinuxCNC GUI to navigate around stage and make adjustments to level out
- TODO: add link / suggestions how to do this
- Use LinuxCNC GUI to navigate to upper left corner of die and in pyuscope hit "set upper left"
- Use LinuxCNC GUI to navigate to lower right corner of die and pyuscope hit "set lower right"
Misc notes:
- b3i default configuration is to power I/O buffers from "SYS_5V", which means external power is required. The easiest way to do this is to supply 5V to the barrel jack using a second USB to barrel jack cable
machinekit setup
cp -r config/brainscope_b3i/ config/my_config/
pyuscope setup
Ubuntu 16.04
cd ~
git clone https://github.com/SiliconAnalysis/pyuscope.git
cd pyuscope
sudo apt-get install -y python-qt4 python-gst0.10 python-paramiko python-serial
sudo pip install pillow
