McScope
This page is about a reference DIY microscpoe control system similar to those used by John McMaster. Its intended to be a good starting place for what options might be for adding automated image capture to a microscope.
You should also take a look at Micro-Manager. If you have a supported stage it may be a better fit
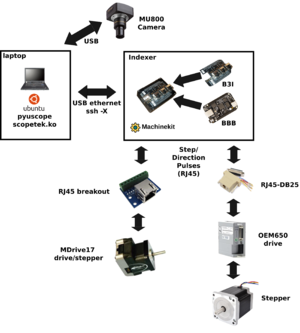
Above: high level sample architecture. In this example one axis uses an MDrive17 and a second axis uses a generic stepper motor without integrated driver. However, in a real system you probably want X and Y to use the same motor/drive
Useful links:
- https://github.com/SiliconAnalysis/pyuscope
- https://github.com/SiliconAnalysis/bbb-scope/blob/master/b3index_r1/b3index_r1/b3index_r1.pdf
- https://microwiki.org/media/scopetek/0001-scopetek-directly-control-RGB-gain.patch
- https://microwiki.org/wiki/index.php/Stepper_Motor
- https://www.machinekit.io
- https://beagleboard.org/black
Terminology:
- Indexer: a device that generates step/direction pulses
- Drive: power electronics for (stepper) motor
- Beaglebone Black (BBB): embedded board with lots of accurate timing I/O
- Machinekit: a CNC controller (indexer) distribution for BBB. Based on LinuxCNC
- BBB Indexer (B3I) cape (PCB): allows BBB I/O to adapt to current/voltage requirements of typical drive photodiodes with convenient connections
- BBB Indexer (B3I) system: b3i PCB + BBB assembly
Reference system, focusing on critical components:
- Microscope
- AmScope MU800 camera
- MDrive17 stepper motors on XY stage
- b3i system
- BBB
- Machinekit
- B3I cape
- T61p laptop
- Ubuntu 16.04LTS
- pyuscope (microscope control software)
- touptek.ko modified for direct RGB control
Misc notes:
- b3i default configuration is to power I/O buffers from "SYS_5V", which means external power is required. The easiest way to do this is to supply 5V to the barrel jack using a second USB to barrel jack cable
Contents
machinekit setup
Start by ssh-copy-id to your BBB to ease future operations. You may also want to setup /etc/hosts entry:
192.168.7.2 mk
And ~/.ssh/config:
 Host mk
 HostName mk
 User machinekit
 StrictHostKeyChecking no
Then prepare a config based on an unscaled template:
cp -r config/scale1_b3i/ config/my_config/
If you know how many steps per mm, edit my_config/axis.ini to set SCALE. For example, if you have:
- 1.8 degree / step motor
- 16 pulse / step microstepping
- 2 rev / mm
You will need to set SCALE to 360/1.8 * 16 * 2 = 6400. In any case, after you edit SCALE, launch the GUI and try moving against a known size object and see if it looks about right. You may want to also just other parameters like MAX_VELOCITY and MAX_ACCELERATION. Its easiest to copy repo to BBB using scp. Consider adding a script to the BBB named run.sh like:
linuxcnc pyuscope/config/my_config/axis.ini
pyuscope setup
Ubuntu 16.04
cd ~
git clone https://github.com/SiliconAnalysis/pyuscope.git
cd pyuscope
sudo apt-get install -y python-qt4 python-gst0.10 python-paramiko python-serial
sudo pip install pillow
Once software is setup, start setting up a microscope on your host:
cd ~/pyuscope
cp config/test/microscope.json config/my_config/
ln -s config/my_config/microscope.json .
Edit microscope.json and set x_view to reflect the field of view (in mm) for your objective(s)
Camera calibration
This is optional, but recommended for serious use. Consider getting a basic system setup first and then come back to it
Apply this patch to touptek.c and install the updated kernel module:
https://microwiki.org/media/scopetek/0001-scopetek-directly-control-RGB-gain.patch
Insert a neutral sample onto your microscope, such as a blank wafer or the back of an IC. Slightly defocus view
python util/bal_gui.py
Hit AWG repeatedly until Red Balance (R_B) and Blue Balance (B_B) have settled to near 0. Copy the values into microscope.json:imager.v4l2 entry. The top entry is default / takes priority. See config/pr0nscope/microscope.json for example. After applying open pyuscope GUI and verify the image is white balanced to gray.
pyuscope workflow
- Connect BBB over USB to host laptop
- Host laptop: static config IP to 192.168.7.1
- SSH -X from T61p to BBB (192.168.7.2)
- Launch LinuxCNC software over X
- Launch server.py RPC client (TODO: bring back automatic launch)
- Use LinuxCNC GUI for all setup movement, not pyuscope
- Optional: white balance camera using cal.py. Write values to microscope.json
- Start pyuscope software
- Select current objective (ie 20x)
- Use LinuxCNC GUI to navigate around stage and make adjustments to level out
- TODO: add link / suggestions how to do this
- Use LinuxCNC GUI to navigate to upper left corner of die and in pyuscope hit "set upper left"
- Use LinuxCNC GUI to navigate to lower right corner of die and pyuscope hit "set lower right"
- Hit run (with dry checked)
- Verify results look reasonable
- Uncheck dry
- Hit run
- Profit
Finally, note that the resulting files can be post-processed with pr0nstitch
Reference systems
| Microscope | Description | Axes | Drive | Motor | Cape | Interconnect | Notes |
|---|---|---|---|---|---|---|---|
| pr0nscope | Metallurgical microscope | 2 | IMS MDrive17 | IMS MDrive17 | Breadboard | DB25 breakout | Should be easy to convert to DB25-RJ45 breakout, but if it ain't broke.. |
| brainscope | Laser probe station | 6? | XY (upper): Rorze RD-021M8
XY (lower): MDrive23 Z (lower): OEM650? theta? |
XY (upper): Superior SloSyn NEMA 23
XY (lower): MDrive23 Z (lower): NEMA 34 Z (upper): removed, was SloSyn NEMA 23 theta? |
B3I-6 | RJ45 breakout | Complex system
Typically I only use XY upper Z focus is done manually |
| k2scope | Confocal microscope | 3 | XY: Compumotor M series
Z: Gecko G320 |
XY: Compumotor M series
Z: DC servo |
B3I-3 | DB25-RJ45 | I tried to manually do Z, but probably needs to be machine precise |
| xy-ray | X-ray panoramic | 2 | IMS MDrive17 | IMS MDrive17 | Breadboard | Breakout | Uses special planner, not pyuscope |
